Mapping CRS Rates
Of the many features a CRS![]() Central Reservations System: Computerized reservation software used to maintain hotel information, inventory, rates, and manage bookings through online mediums via various booking channels (GDS, IBE, OTA, etcetera). may provide any given property, one of the most widely used options is the connection of rates between your PMS (Chorum) and your CRS provider, allowing you to sell rooms online through the GDS
Central Reservations System: Computerized reservation software used to maintain hotel information, inventory, rates, and manage bookings through online mediums via various booking channels (GDS, IBE, OTA, etcetera). may provide any given property, one of the most widely used options is the connection of rates between your PMS (Chorum) and your CRS provider, allowing you to sell rooms online through the GDS![]() Global Distribution System: An online network infrastructure spanning the globe, allowing travel agencies to search for inventory listings and book rooms on behalf of a guest., OTAs
Global Distribution System: An online network infrastructure spanning the globe, allowing travel agencies to search for inventory listings and book rooms on behalf of a guest., OTAs![]() Online Travel Alliance: A travel agency or group of agencies that facillitate online booking, such as Expedia or Priceline. or your own IBE
Online Travel Alliance: A travel agency or group of agencies that facillitate online booking, such as Expedia or Priceline. or your own IBE![]() Internet Booking Engine: An online portal (usually a website) that directly connects to your CRS inventory. The IBE may or may not be maintained with the assistance of an OTA. at the same amounts you set in Chorum, and, provided you have connected them properly, whenever you change the rate in Chorum it will automatically update online. This process of connecting the rate between systems is called "mapping."
Internet Booking Engine: An online portal (usually a website) that directly connects to your CRS inventory. The IBE may or may not be maintained with the assistance of an OTA. at the same amounts you set in Chorum, and, provided you have connected them properly, whenever you change the rate in Chorum it will automatically update online. This process of connecting the rate between systems is called "mapping."
Before you begin, be aware that you must have the rate built in Chorum (see Rate Code Maintenance), then you must also have the rate code built in your CRS system. If doing so is not a task you are familiar with, we recommend reaching out to your CRS provider directly for guidance. Note for best results, we strongly recommend the Rate Code used in both Chorum and your CRS are identical, to prevent unwanted or unintended conflicts between the systems.
If your property subscribes to Chorum CRS, this means we are considered your CRS provider. Self-help materials are provided for your convenience from the Windsurfer Support Center (located in the top-right corner of your CRS portal). Select Helpful Articles, then choose the category Rate Management from the list of available subjects. Anything you might need to build the rate in Chorum CRS will be listed here. If you are still in need of assistance or guidance, feel free to contact us via the Chorum Support Center here.
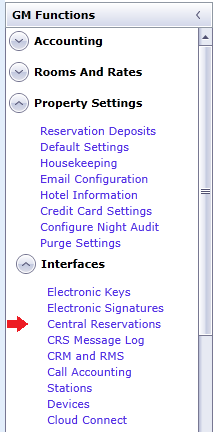
Once you have built the desired rate in Chorum, and you have configured a matching rate code in the CRS, access the GM Functions module, expand the Property Settings folder, then the Interfaces folder, and select Central Reservations.
Select your [active] CRS from the top menu by either clicking in the gray square to its left, or clicking in the blank space immediately following the row's Description column. The row will highlight yellow to indicate it has been selected.

At the bottom of the menu, locate the CRS Translation Tables section. In the upper left-hand corner of this section, change the drop-down to Rate Codes (if not already selected).
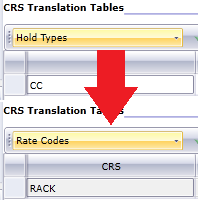
Use the New Row button to add a blank row for configuration. Otherwise, if you are updating an existing mapping, select it from the list that generates below.
Set the CRS column to match the rate code configured in your CRS interface and set the CloudPM column to match the rate code configured in Chorum. Remember - for best results, both codes should otherwise be identical in both systems to prevent unwanted or unintended communication errors.

Save your work when finished. The rate is now mapped!